Adding a New Machine to ShopFloorConnect
This page explains how to add a new machine to ShopFloorConnect. For this procedure, we're making the following assumptions:
- You are able to log on to ShopFloorConnect with administrative privileges.
- The SFC Dialog Reason Master List has already been configured.
- The new machine will be placed into an existing department.
- The new machine will be an additional example of an existing machine type.
- The new machine will use the same production calendar as an existing machine.
- The device installed on the machine (SmartPAC or SMI) is accessible on the network, and you have made note of the device's IP address.
Part 1 - Setting up the Machine Configuration
- Log on to ShopFloorConnect, click on the "Administrator" Link in the top-right corner of the page, and select the "Machine Config" tab.
- If it's not unchecked already, uncheck the box labeled "Show Enabled Machines Only".
- The table that is displayed will show a mix of already enabled machines (white background) as well as a large number of as-yet-assigned machine templates
that are "grayed out".
The full "behind the scenes" compliment of machine configuration settings is vast, so we've included a series of mostly configured "boilerplate" machine templates for each type of device that can communicate with ShopFloorConnect (these are the grayed-out rows in the table). The rest of this section will describe how to complete these settings for your new machine. - Scroll through the table to find the first available Machine ID boilerplate for the device on your new machine. The Machine ID is in the left-most
column of the table. Their corresponding device types for the machine ID numbers are:
- 1XXX - Wintriss SmartPAC 1
- 2XXX - Wintriss SmartPAC 2
- 3XXX - LETS Machine Interface (LMI) Discontinued
- 4XXX - LETS Basic Interface Discontinued
- 5XXX - ShopFloorConnect Machine Interface 1 (SMI-1)
- 6XXX - ShopFloorConnect Machine Interface 2 (SMI-2)
- Note the Machine ID of the row you've selected (You'll need it later when we enable the communications) and click the "Edit." link. The row background color will turn
from gray to yellow.
- In our example, we are going to add a new machine called "Laser Work Center 1". Set the machine config parameters as follows:
- Machine Name - (Text box) This will be the name used for the machine throughout ShopFloorConnect
- State Icon - Select the icon to display on the Factory Viewer Equipment Summary
- Machine Type - (Pull-down menu) Select the machine type for the new machine from the pre-existing list
- Area Name - (Pull-down menu) Select the area where the machine is located
- Enabled - This box must be checked for the machine to appear in SFC
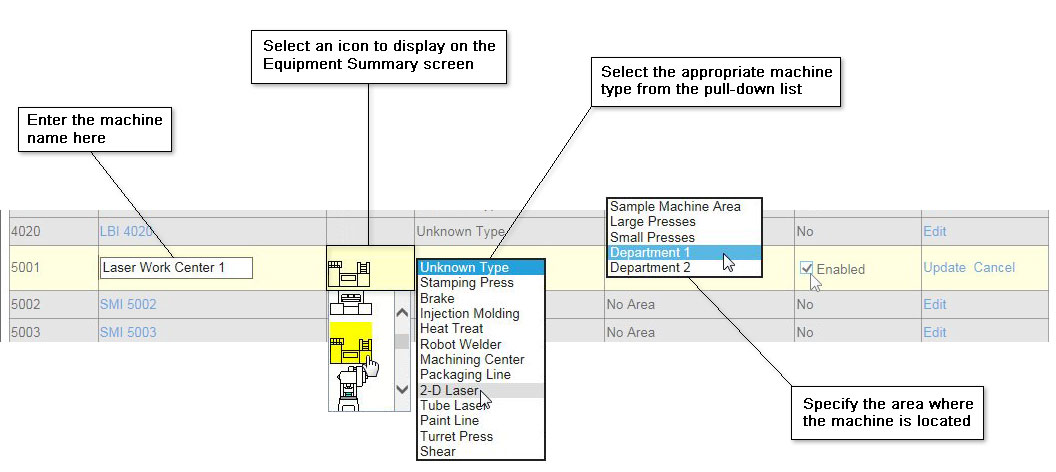
Figure 1 - Machine Config Settings
Part 2 - Assigning Calendars to the Machine
The calendars are used when running reports by day, shift, etc. Calendars can be created from scratch, or (more often) copied from an existing machine with the same shift schedule. For our example, we are going to copy the calendar currently being used by the 3-Axis Mill.
- Log into the Administrator and click on the "Calendars" tab.
- Find an existing machine with the same shift schedule as your new machine and click on the machine name link for the parent machine (we're using the 3-Axis Mill in our example).
Note that the area under our new machine (Laser Work Center 1) is blank. We'll change that soon.
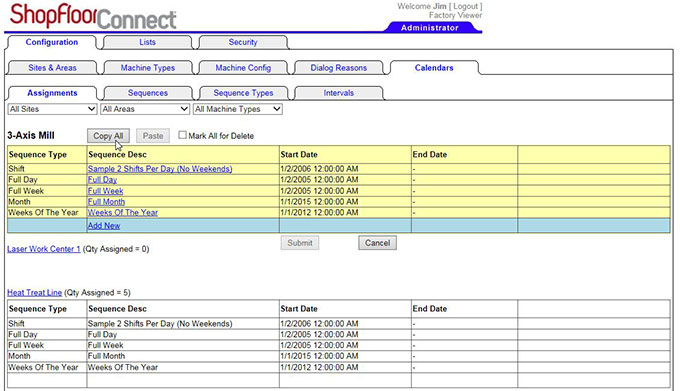
Figure 2 - Copying an existing machine calendar
- Click the "Copy All" Button.
- Click on the link for the new machine (ours is "Laser Work Center 1"). An empty green and yellow table should appear below the name,
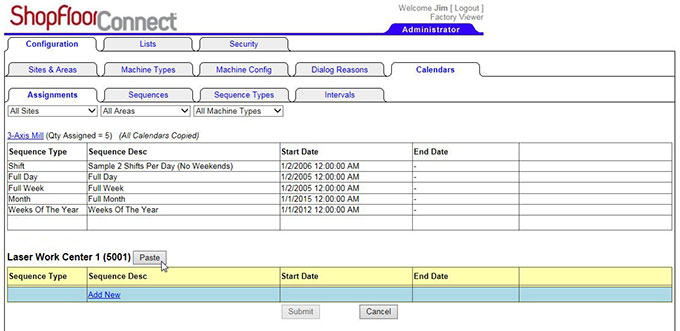
Figure 3 - Open the calendar for the new machine
- Click the "Paste" button. The calendars for the new machine should now match the ones from the parent machine.
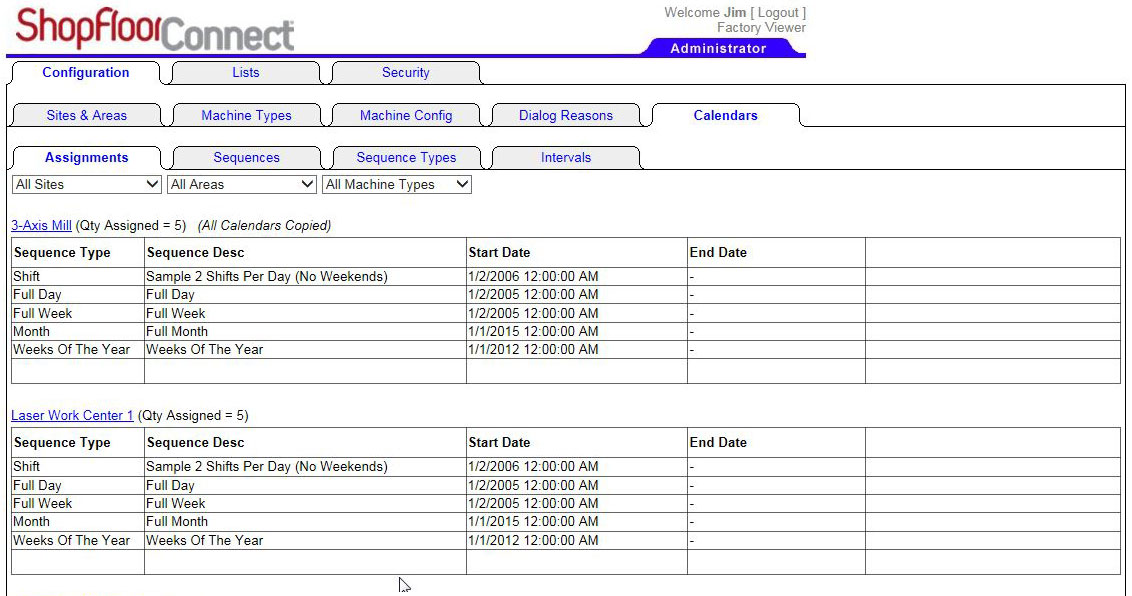
Figure 4 - The calendar settings for the new machine should match those of the parent machine.
Part 3 - Configuring Data Collection (Kepware)
ShopFloorConnect uses a communication program made by a company called Kepware. The next step in setting up a new machine is to enable communications and provide
Kepware with the machine's IP address. You must log on to the ShopFloorConnect server to access Kepware, it is not accessible through the Factory Viewer web browser interface.
NOTE: You are going to need to know the machines 4-digit Machine ID mentioned on Step 5 of "Part 1 - Setting up the Machine Configuration" above, as well as the IP address that has
been assigned to the device (SP1, SP2, LMI, SMI or SMI-2) that is installed on the machine.
- Log onto the ShopFloorConnect server. From the Start menu, select All Programs > Kepware > KepServerEX 5 > KepServerEX 5 Configuration
Figure 5 - Open the Kepserver Configuration program on the ShopFloorConnect server.
- The Kepware Runtime screen will appear. The panel on the left shows a list of machine ID numbers, the panel on the right will be blank. In the
panel on the left, scroll to the Machine ID for the new machine and click on the + sign next to the machine.
- Right-click on the icon (SP1, SP2, LMI, SMI or SMI-2 depending on the device installed on the machine) and select "Properties".
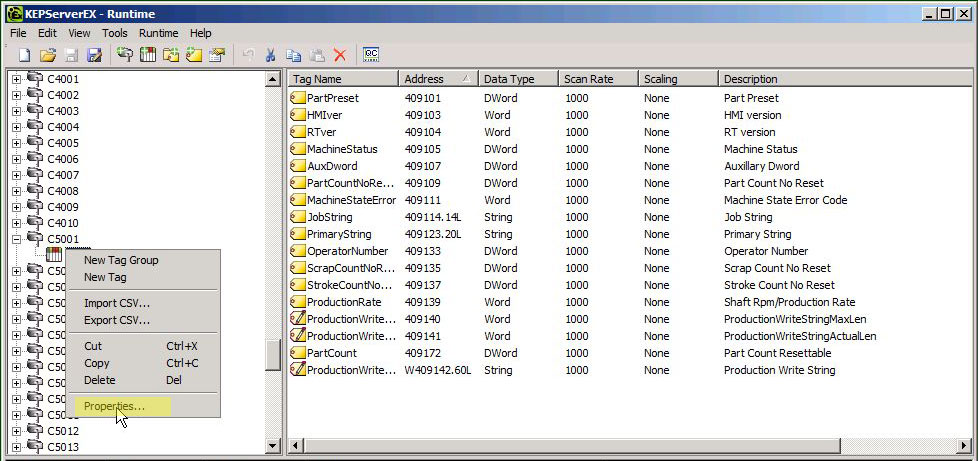
Figure 6 - Open the Kepware Communications Properties window for the new machine.
- If the machine is equipped with a SmartPAC 2 or SMI-2, the properties window shown below (Figure 7) will appear. Click the Enable Data Collection check box,
and enter the IP address in the "ID" field between the < and > signs. Click "OK" when done.
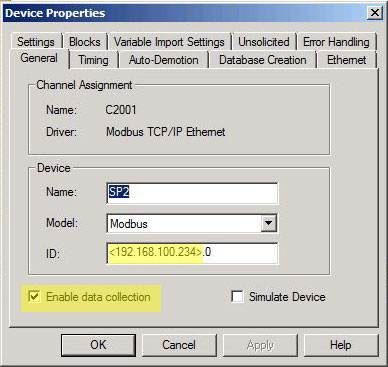
Figure 7 - Settings for SmartPAC 2 and SMI-2.
- If the machine is equipped with an LMI, SMI-1, or SmartPAC 1, the properties window shown below in Figure 6 will appear. Click the Enable Data Collection check box,
then click on the tab labeled "Ethernet Encapsulation".
- Enter the IP address in the field labeled "IP Address". Click "OK" when done.
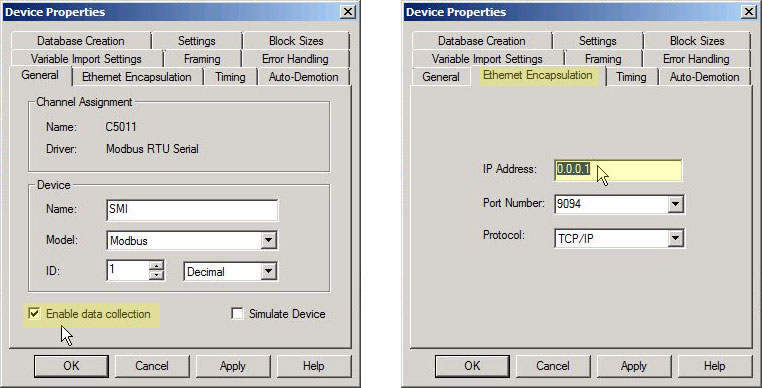
Figure 8 - Settings for SmartPAC 1, LMI, and SMI-1.
- Communications are now enabled. The final step before exiting Kepware is to save the configuration. Click "File then "Save As...". When the dialog box opens, simply click the name of your
current configuration (.opf) file then click the "Save" button (See Figure 8). In our exmaple, the file name is "WGC-TEST02Kep5.opf".
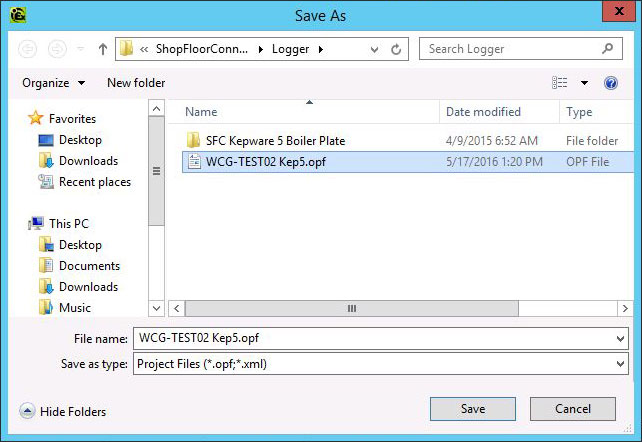
Figure 9 - Saving the .opf File. - You may close the Kepware Runtime window.
Part 4 - Creating the Downtime Reason Menu
The following procedure describes how to create the Dialog (downtime reason) menu for the LMI, SMI-1, SMI-2, and SmartPAC 2 with the "Custom 32" downtime mode enabled. Click here for instructions on how to set up the downtime menu for the SmartPAC 1 or SmartPAC 2 with the "16/16" downtime mode selected.
- Log in to the Factory Viewer and verify that your newly-added machine is on the network and communicating with ShopFloorConnect. Please note that your device must
remain online with the machine stopped (not running) throughout this procedure in order for the device to receive the downtime reason menu from ShopFloorConnect.
- Click on the "Administrator" link in the top-right corner of the Factory Viewer page.
- Select the "Machine Config" tab and check the "Show enabled machines only" box.
- If you want to start by copying the downtime menu from another machine, skip to Step 8 below. If you wish to create the downtime menu "from scratch",
locate the newly added machine and click on the machine name.
- If it's not selected already, click on the Dialog Reasons tab. ShopFloorConnect will display a table with 32 downtime "spots" - each with a pull-down
list to select the downtime reason for that menu position. A newly enabled machine will have no downtime menu yet, so all of the spots will be grayed out, with "Unassigned" displayed in the box.
Any position with "Unassigned" selected will not appear in the downtime menu. In other words, even though there are 32 spots available, if you were to assign reasons to only four spots, your downtime
menu on that machine would have four choices.
- To select a reason, click on the arrow on the right side of the box, and click the appropriate reason on the pull-down menu. The pull-down is populated by the Master Dialog
Reason List, which should already be configured. If not, or if you wish to add a new reason to the list, refer to the instructions for setting up the Downtime Reason Master List
The order in which you select the reasons determines their position in the menu at the machine. So the reason in position 1 will be the first item in the menu, position 2 the second, etc.
You should select what you anticipate will be the most frequently used reasons first, and leave any obscure reasons for the end of the list. Continue adding reasons until you've built up you menu.
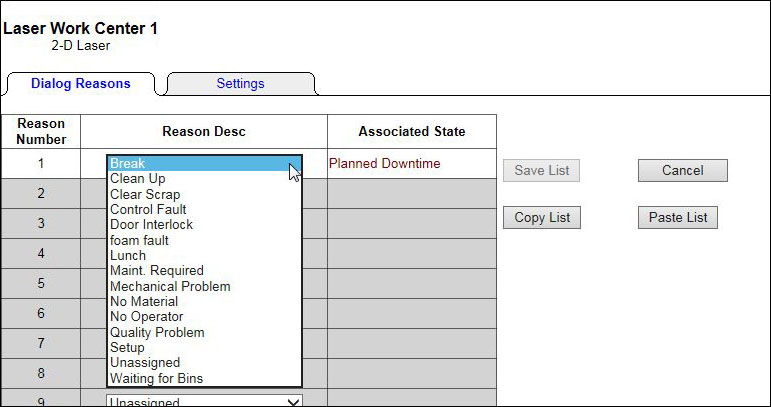
Figure 10 - Selecting downtime reasons from the pull-down list - When you're done, click the "Save" button to save the downtime reasons to the ShopFloorConnect Database, and to send the downtime menu to the device on the machine. The device on the machine must
be online, able to receive data from SFC, and the machine must be stopped in order to complete this step.
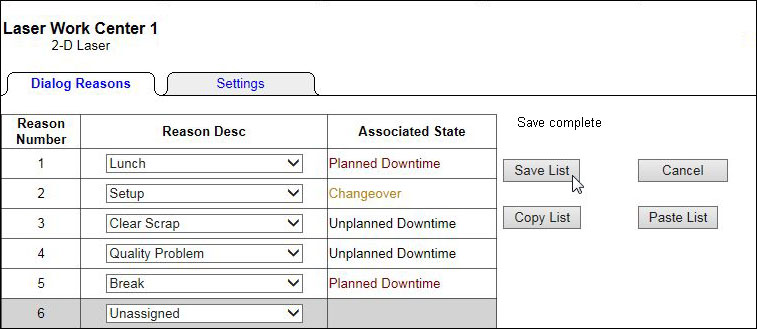
Figure 11 - Saving the completed downtime menu
- If the new machine is the same device type (SMI, SmartPAC 2, etc) and machine type as an existing machine, you may copy the downtime reason list from the existing machine.
First, identify the existing machine from which you want to copy and click the machine name. This will open the
downtime reason menu editing page for that machine. We will use the downtime list from the "Work Center 1" in our example.
- Click the "Copy List" button near the top of the page. The message "Currently Copied List: [machine name]" will be displayed.
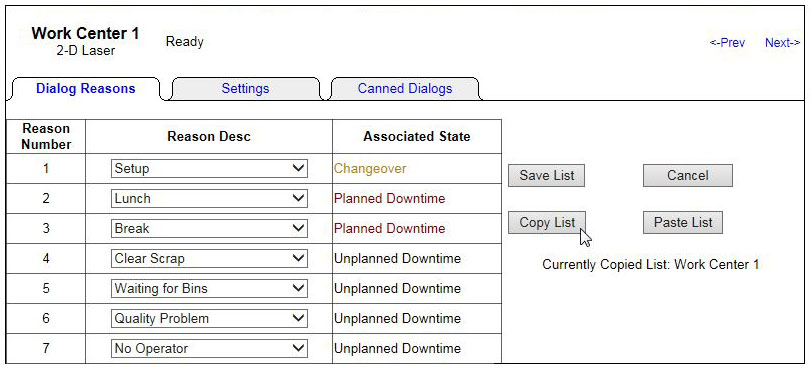
Figure 12 - Copying an Existing List - Click the "Machine Config" tab to go back to the machine list, then click the name of the new machine, and the "Paste" button.
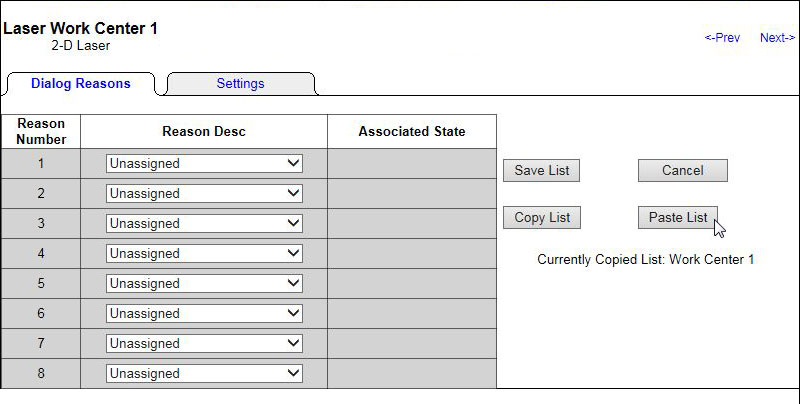
Figure 13 - Pasting the Copied list into a blank menu for a new machine
The previously copied list will be inserted into the new machine's downtime list. Make any changes to the list (if necessary) and click the "Save List" button. Please note that the device on the machine must be online, able to receive data from SFC, and the machine must be stopped in order to complete this step.
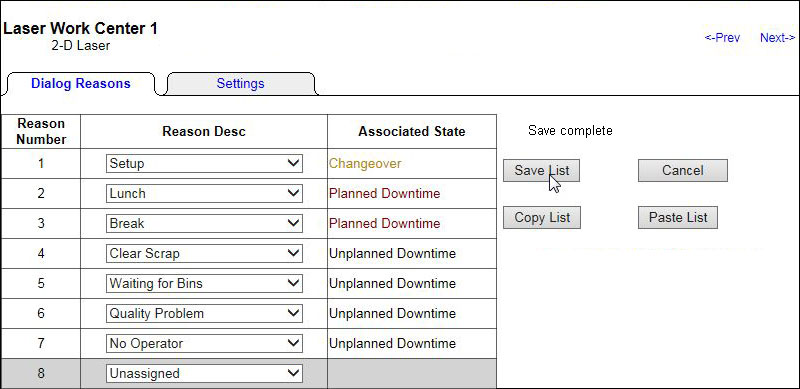
Figure 14 - Copied list pasted into new machine. Click the "Save" button to send the list to the machine. - The downtime menu is now ready to use.
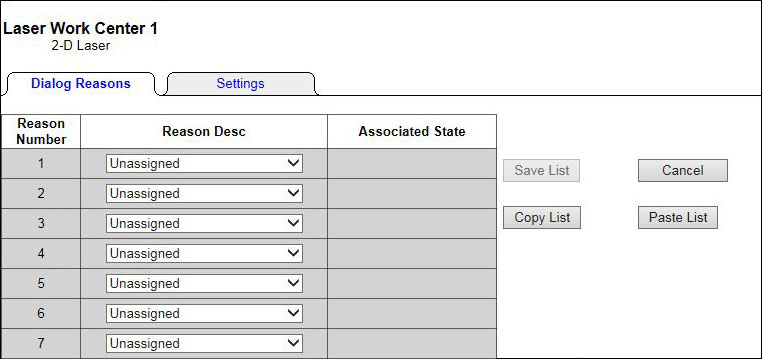
Figure 9 - A blank downtime reason menu for a new machine
Part 5 - Configuring the Global Machine Settings
ShopFloorConnect calculates and displays various efficiency ratings on many Factory Viewer pages, and in several reports. In order to accurately display ratings for each machine, there are several ratings and standards that need to be provided.
In addition, there are two ratings - the Standard Rate and Production Ideal Rate that are applied by Primary item, in other words, each individual part/primary item gets it's own version of these two ratings, which are set at the machine level. However, whenever ShopFloorConnect detects an unknown (or new) primary item in a machine, it needs to apply something as a placeholder until the Standard and Production Ideal Ratings can be set specifically for that primary. These are the Default standard and Production Ideal Ratings shown below.
- Log on to ShopFloorConnect, click on the "Administrator" Link in the top-right corner of the page, and select the "Machine Config" tab.
- If it's not checked already, check the box labeled "Show Enabled Machines Only".
- Select the newly added machine from the list by clicking its name, then click the "Settings" tab.
- Edit the values by clicking the "Edit" link in each row. Here is a description of the settings:
- Machine Ideal Rate - This is the maximum speed (production rate in parts/minute or parts/hour) that the machine is capable of running.
- Default Production Ideal Rate - This is the Production Ideal Rate (in either parts/minute or parts/hour) that will be used to calculate the OEE by Primary when a new Primary Item
is detected. This "placeholder" value will be used by SFC until a specific Production Ideal Rate is set for the newly detected Primary Item
- Default Standard Rate - This is the Standard Rate (in either parts/minute or parts/hour) that will be used when a new Primary Item is detected. This "placeholder" value
will be used by SFC until a specific Standard rate is set for the newly detected Primary Item
- Standard Uptime Efficiency - This is the "normal" percentage of the overall time that you expect the machine to run. For example, if a machine - on
average - normally runs 45 minutes out of every hour, the standard uptime efficiency should be set to 75%.
- Standard Setup Time - This value is reserved for future use and is not currently needed
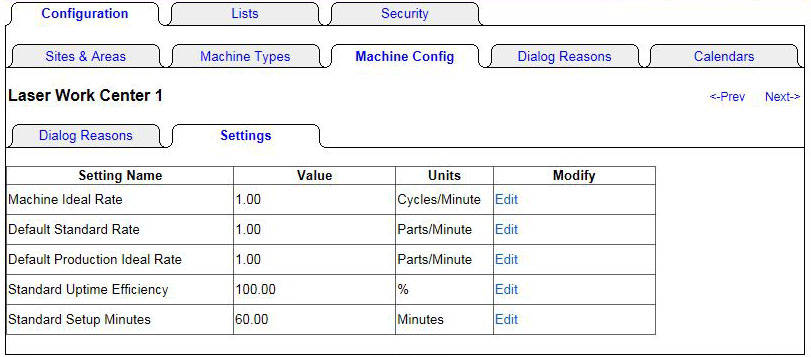
Figure 15 - The Global Machine Settings (default values are shown).
Download a PDF with these instructions
- Machine Ideal Rate - This is the maximum speed (production rate in parts/minute or parts/hour) that the machine is capable of running.